

Fill stockings with rock salt – any stockings will do. (Photo courtesy of Roma Costume, via Creative Commons, all rights reserved.)
A very brief and unadorned post about ice dams, which lots of people are contacting me about.
This is a very brief primer on what you need to do now, even if the roofer gets all the ice off. After you’ve taken care of the ice dams, be sure to read how to save money by keeping them away.
The idea is fairly simple, create a channel for water to flow down off the roof rather than freezing at the gutter. You don’t need to remove all the ice, just create one or more channels.
- Get yourself a number of stockings and some rock salt, preferably calcium chloride. (Calcium chloride works better in cold temperatures, which we’re about to experience.)
- Fill the stockings with the rock salt and tie them off.
The next steps depend on whether you have access to the dammed area (ie, through a window or skylight, via a deck) or not.
IF YOU HAVE ACCESS TO THE ROOF:
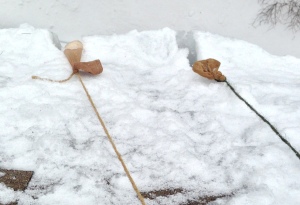
Stocking tossed from a skylight. Note the right stocking melted before the gutter – worst case, that can cause melting water to dam, rather than help.
3. Place the filled stockings, approximately 2’ apart, on the edge where you had the dam. Allow the stocking to drape slightly over the edge.
IF YOU DO NOT HAVE ACCESS TO THE ROOF:
- Cut lengths of string or rope, bit longer than the length from ground to your roof. Cut as many lengths as you have stockings.
- Tie a piece of string around the knotted end of the stocking.
- As best you can, throw the stocking to the roof in the area of the dam. Throw it farther up the roof than the gutter and use the string to gently tug it into place. You want them to drape slightly over the edge of the gutter so the water has a clear channel to flow off the roof. Using the string/rope and pulling is far easier than trying to throw a salt-filled stocking 30’ in the air into exactly the right spot.
Note: Using a roof rake or other long stick can be helpful for this.
A FEW OTHER NOTES:
Why isn’t it working yet?: It can take hours, sometimes as much as 24 hours, for rock salt to appear to start working. Patience is hard to come by when you’ve got an unplanned water feature in your kitchen, but try.
It stopped working! What happened?: The salt, just like salt on the road, will disappear. To maintain the channel you will need to fill new stockings, perhaps as often as every 24 hours.
What about socks or peds?: No. Use stockings, preferably knee-high or larger. This isn’t a fashion statement, it is chemistry and physics. Socks won’t allow enough contact with the salt and peds are too small.
More is better, no?: So why not just pour rock salt all over your roof? For one thing, you’d need huge quantities of rock salt – more than you can fit in your car. For another, you’re only trying to create a channel for the water. You’ll still have ice on either side of that stocking, but the water will flow out.
Roof rake: If you have access to a snow rake, use it. You can’t prevent more snow from falling, but you can prevent that snow from melting on your roof and contributing to the ice dam.
Bash the hell out of the ice, dammit!: (Alternatively, “DIE, ICE, DIE!”) Yeah, you can do that, but I’m not fond of suggesting anybody without extensive experience working on 30′ ladders in freezing cold conditions (boots and gloves freeze to ladders) wield a hammer and likely damage their roof, let alone their bodies. Hire someone, and make sure they have insurance.
Once it is all said and done, learn how to prevent this from happening next year.