
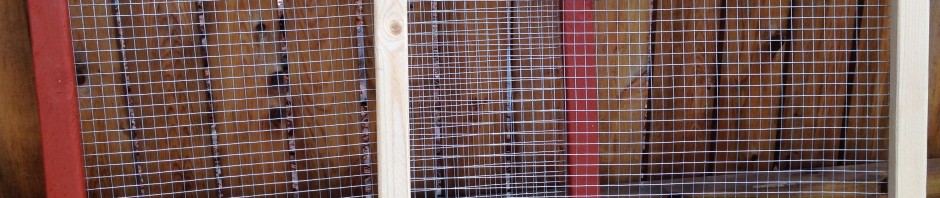
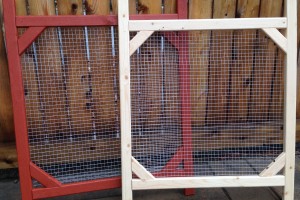
Compost screens, finished and unfinished.
I’ve taught a few classes and done some exhibits about compost recently and have had a great time answering questions.
Several people have asked about the sifter/screen I use. I always point out that you don’t really need a screen, or that in a pinch a milk crate will do the job, but if you want a screen to give you a finer product, then this is a great, sturdy, lightweight unit.
Most people with just a few tools can build this compost screen which is designed to be light enough that people with limited upper-body strength can use it. The arms rest across most wheelbarrows and it is sturdy enough to handle sifting compost or getting rocks out of soil.
You really can make it yourself with just a few tools, but if you’re local to Arlington, MA and want me to make one for you, I make and sell them for $20 which covers the cost of materials (purchased at stores in town) and a bit extra to fund projects like making these for Arlington schools, maintaining a preschool garden, etc.
Before purchasing (contact me), take a moment to read pricing and a FAQ about the screens I sent to a local gardening group.
HOW TO MAKE A LIGHTWEIGHT COMPOST SCREEN
Tools:
- Saw: This can be anything from a hacksaw to a back saw to a compound miter saw. If it cuts wood, it will work for this.
- Staple gun
- Drill/driver (Non-carpenters: This means a drill that can drive screws, which is all homeowner drills these days.)
- Paintbrush or foam paint brush, if staining the wood
- Pencil
- Ruler
- Hammer
- Tin snips
- Eye protection
- Gloves (your garden gloves are fine)
Materials:
- Two 8′ lengths of 1×2 wood. (Not “strapping,” you want 1×2 for this design.)
- Staple gun staples
- 16 2.5″ Drywall or (better) exterior screws.
- 2′ of 2′ tall “hardware cloth,” the metal stuff that many people still refer to as “chicken wire” even though it has square holes. 1/2″ hardware cloth is fine for most purposes, but for very finely screened compost get 1/4″.
- Exterior stain (I like deck stain) if you plan to treat the wood, which I recommend.
Getting to work:
1. Cut two lengths of wood 22″ and another two lengths of wood 30″.
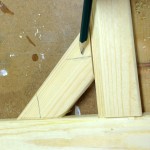
2. Cut four pieces of wood, approximately 5″ long, with a 45 degree angle on both ends. (See photo at step 9, below.)

3. Measure 2.5″ from edge of long boards.
3. Place your 30″ boards together and, using your ruler, mark 2.5″ from an end, as right.
Do the same on the other end.
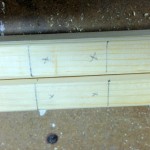
4. All marked up and nowhere to go.
4. Lay one of the smaller boards, a corner piece or a piece of scrap across the two long boards at the mark you just made and scribe (mark) a second line, toward the middle of the board. You’ve just marked where the boards will attach.
Mark two Xs between those lines – this is where you’ll drill holes. Do the same thing on the other end of the board. (See how far you’ve gotten already? You’re awesome! )
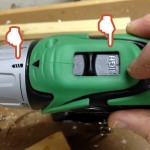
5. Set drill speed to “High” and clutch to the drill bit symbol.
5. Drill, baby, drill! Set the speed on your drill to “High” (as in the photo) and the clutch (series of numbers near tip of your drill) to a symbol that kind of looks like a drill bit. This sets your drill to make holes rather than drive screws.
6. Find two pieces of scrap wood – wood that if you destroy it, nobody will care. Lay your boards across those two pieces (scrap under the markings) and, using a 11/64″ sized drill bit, drill through the wood where you marked those “X”s. Take care to drill straight down and not at an angle.
7. Scrap wood is used to raise the work piece. Any wood is fine as long as they’re the same size.
7. You’re ready to start assembling. Find yourself a large flat surface – a work table or picnic table are both good. It is a good idea to raise all four pieces above the surface of the table by putting scrap underneath them. Your drill is too wide to put the screws in well unless the parts are raised. Yes, I just called your drill fat.
8. Line things up. Butt the end of one small piece to the spot you marked on your long piece.TURN DOWN YOUR DRILL! Remember when you set it to “High”? Set that to “Low” and turn the clutch down a few stops from the drill-bit icon. Then, drill your screws through the long piece into the short one. You may want to hold the pieces down so they don’t move around. If you’re afraid of getting your hand pinched then simply lay a small piece of scrap (or a corner piece) across them first. Attach all four pieces.
9. Draw a straight line to help envision where the screw will go.
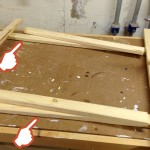
9. You should now have a square, with four pieces poking out of the square, just like the photo at the top of the page, yes? Good. Time for the corner braces.
These are going to keep your screen together through good times and bad. For simplicity later, lay each corner piece into a corner, any corner, except that one. Oh fine, if you want, you can use that corner too. Place it there and, imagining how the screw will go through the corner piece and into the frame, make a straight line, just like this.

10. X marks the spot, the line acts as a guide.
10. Now make an X on the adjacent side of the wood – this is where you’ll drill your pilot holes. This really just makes it easier to see what you’re doing when you drill the holes. Or seen a different way, this makes it more difficult to screw up.

11. Drill the holes, using the line you made on the side as a guide.
11. This is the point at which professional carpenters will howl with rage, if they haven’t already.
Mark all your corner pieces. Turn your drill back up to “High” and to the drill-bit icon. Hold all the pieces together, put them on top of some scrap wood and drill, from the X, through the wood, using the lines you made earlier as a guide. (Hear that cursing? That’s your carpenter neighbor screaming at me.)
12. Remember the scrap wood you used earlier when assembling the square? Lay them down again to raise the piece, put the corner braces in place and screw them in. Remember to turn your drill to “Low” and the clutch down a few stops. Your unit is now sturdy, light and assembled, except for the metal screen itself.
13. At this point, before attaching the screen, I recommend using an exterior finish to protect your work. I like deck stain, in large part because I already have some, but you can use whatever you want, or nothing at all, as long as you’re comfortable that it will rot faster. I’ve had mine (stained) for five or more years, left it exposed to the elements for months at a time (not-advised) and they still have many more years left in them. So put two coats of deck stain on and then go have a drink while the stain dries. You’ve earned it.
14. Awake and ready to go? Good, because you’re about to embark on what is perhaps the most dangerous and difficult part of this project: Unrolling hardware cloth. The cloth is wrapped very tightly and bound by one (or more) pieces of wire.
If you start to untie the cloth while holding the roll with your bare hands it is possible to get the skin of multiple fingers pinched between layers. How any damn fool could let this happen is beyond me, but this damn fool can tell you from personal experience that it hurts.
By contrast, if you lay it on the floor and just cut through the wire that binds it all together, it can kind of explode across the floor as it springs open. Got your attention yet? Put on a pair of gloves, some eye protection, say a prayer to whoever you’re fond of, and have at it. There is no “best” way to do this that I’m aware of, only really bad ways (outlined above). The “spring open” model is probably better. Good luck to you.
15. Eye protection should be on your head, not the table.
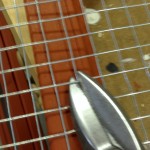
15. Still here? Good, that means you’re okay, right? Good. Now you’re going to cut that hardware cloth. Lay it out on top of your beautiful, newly painted wooden frame. (Metal-cutting tools and goggles are for display. You should be wearing the goggles and prepared to use a snip.)
16. Cut as close to the edge as possible so you don’t have pointy nubs jabbing into your fingers later.
16. You don’t need a ruler – just lay the piece so it extends to the wood on all four sides. Unroll it (and later attach it) the “long way” across the frame.
It should overlap far enough that you can attach it to the wood with the staples later. Lined up? Good, now use the snips to cut the cloth. Best practices will depend on what type of snip you use, but if your cuts leave nubs, try angling your snips so you don’t get nubs. If the nubs are longer than you want, you can try filing them down a bit.
17. All that’s left to do is staple it in place every few inches. I like to add a few staples to the corner braces as well, for stability.
18. Look at what you just did. You are awesome, and, since you’re done with power tools for the day, you can have a drink. You earned it.
Too much for you? You can always use a milk crate, or see here if you’d like me to build one for you.